OAuth 2.0 is a framework used to allow secure data sharing between applications. The user works in one app but sees the data from another. For example, you’re logged in to your Salesforce mobile app and see your data from your Salesforce org. Behind the scenes, the apps perform a kind of handshake and then ask the user to authorize this data sharing. When developers want to integrate their app with Salesforce, they use OAuth APIs. Here are a couple of examples.
A mobile app that pulls contacts from a Salesforce org uses OAuth.
A Salesforce org that gets contacts from another service also uses OAuth.
Workbench uses oAuth 2.0 protocol for connecting with salesforce.
Connected App
Connected app framework controls external applications to salesforce
Connected app uses standard protocols such as SAML,oAuth, OpenConnect
There are four main use cases for which your org can implement connected apps.
Access Data with API Integration- You can use a connected app to integrate external applications with the Salesforce API, such as a web-based app that pulls in order status data from your Salesforce org.
Integrate Service Providers with Your Salesforce Org- You can also use connected apps to integrate service providers with your Salesforce org,
Manage Access to Third-Party Apps- To set security policies to control what data a third-party app can access from your org.
Provide Authorization for External API Gateways- You can configure a connected app to provide authorization for external API gateways, such as API gateways hosted on MuleSoft’s Anypoint Platform.
Connected app owner vs connected app consumer
As a connected app owner, your org built the app. You can edit the app’s characteristics and manage its access policies. For example, you decide the type of information (such as a client secret) that the connected app must provide to gain access to data in your org. So how can you easily tell whether your org owns a connected app? The best way is to locate the connected app in the App Manager, click the dropdown arrow next to it, and see which options are provided.
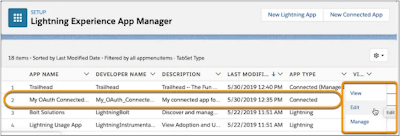
As a connected app consumer, your org installed the app from the AppExchange, as a managed package from another org or a third-party vendor’s website, or as metadata without packaging. You can edit only the app’s access policies, such as who can use the app and whether the app can access data from a remote location.

Tokens
Salesforce uses OAuth protocol to allow users of applications to securely access data without having to reveal the username and password credentials. Now the question is how it works without a password? The answer is Token. With the help of Token, it connects to other applications. There are the following types of tokens:
Authorization code-
The authorization server creates an authorization code, which is a short-lived token and passes it to the client after successful authentication. Only used in OAuth 2.0 with the web-server flow, the authorization code is a token that represents the access granted by the end-user. The authorization code is used to obtain an access token and a refresh token. It expires after 15 minutes.
The client sends the authorization code to the authorization server to obtain an access token and, optionally, a refresh token
Access Token -
Instead of using the user’s Salesforce credentials, a consumer (connected app) can use an access token to gain access to protected resources on behalf of the user.
After a client is authorized, Salesforce sends the client an access token. The client passes the access token to the resource server to request access to protected resources. The resource server validates the access token and additional permissions in the form of scopes before granting access to the client.
The access token has a longer lifetime than the authorization code, usually minutes or hours. When an access token expires, attempts to use it fail, and the client must obtain a new access token by using a refresh token or reinitiating the authorization flow.
Refresh Token-
Like a password, a client can repeatedly use a refresh token to gain access to the resource server. When a refresh token expires or a user revokes it outside of the client, the client requests a new access token, typically by implementing the authorization flow from the start.
A refresh token can have an indefinite lifetime, persisting for an admin-configured interval or until explicitly revoked. The client can store a refresh token and use it to obtain new access tokens. For security, the client must protect a refresh token against unauthorized access.
The OAuth 2.0 user-agent and the OAuth 2.0 web server flows can request refresh tokens if the refresh_token or offline_access scope is included in the request.
4. Id Token - Users for OpenId connect.
oAuth Scope
Scope provides selective enabling of access to a user’s account based on required functionality
In Salesforce, scopes control the types of resources available to an application. Some of the scopes are:
Api - Allows access to the current, logged-in user’s account using APIs, such as REST API and Bulk API 2.0. This scope also includes chatter_api, which allows access to Connect REST API resources.
Chatter_api
Full - Allows access to all data accessible by the logged-in user, and encompasses all other scopes. NOTE full doesn’t return a refresh token. You must explicitly request the refresh_token scope to get a refresh token.
Id- Allows access to the identity URL service. You can request a profile, email, address, or phone individually to get the same result as using id because they’re synonymous.
Refresh_token-Allows a refresh token to be returned when the requesting client is eligible to receive one. With a refresh token, the app can interact with the user’s data while the user is offline. This token is synonymous with requesting offline_access.
web- This scope allows the app to use the access token on the web, and allows access to customer-created Visualforce pages.
Manage Access to a Connected App
With the help if OAuth Policies, you can manage below two items:
Which Users Can Access the Connected App - Configure the Permitted Users policy. The Permitted Users policy defines whether users are pre-authorized to run the connected app. The Admin approved users pre-authorized option allows only users with the associated profile to access the app without first authorizing it. The All Users may self-authorize option enables anyone in the org to authorize the app after successfully signing in
Where Users Can Access the Connected App From-Under OAuth policies, click the IP Relaxation dropdown. These are the options you can choose from:
Enforce IP restrictions—This option enforces the IP restrictions configured for the org, such as the IP ranges assigned to a user profile.
Enforce IP restrictions, but relax for refresh tokens—Like the Enforce IP restrictions option, this option enforces the IP restrictions configured for the org, such as the IP ranges assigned to a user profile. However, this option bypasses these restrictions when the connected app uses refresh tokens to get access tokens.
Relax IP restrictions for activated devices—This option allows a user running the app to bypass the org’s IP restrictions when either of these conditions is true.
The app has a list of allowed IP ranges and is using the web server OAuth authorization flow. Only requests coming from these IPs are allowed.
The app doesn’t have a list of allowed IP ranges. But it uses the web server authentication flow, and the user successfully completes identity verification if accessing Salesforce from a new browser or device.
Relax IP restrictions—This option allows a user to run this app without org IP restrictions.Although this option would allow Help Desk users to run the Customer Order Status App from a customer’s site, the user wouldn’t have to verify their identity to Salesforce. You want to maintain the security that authentication provides, so you don’t want to use this option for the connected app.

oAuth Flow
An oAuth authentication flow defines a series of steps used to coordinate the authentication process between your application and salesforce.
Salesforce provides you with a wealth of different flows - each serving a different purpose. For almost all flows, a connected app must be created in Salesforce first before a connection can be established.
User-Agent Flow (Mobile/Desktop App Integration)
Web Server Authentication Flow (Web Application Integration)
JWT Bearer Token Flow (Server to Server Integration)
SAML Bearer Assertion Flow
Refresh Token Flow
Username and Password Flow
Device Authentication Flow (IoT Integration)
Asset Token Flow
User-Agent Flow (Mobile App Integration)
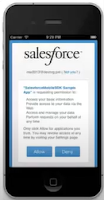
It is used for mobile or desktop applications, for example, Dataloader, Salesforce1, or Mobile SDK.
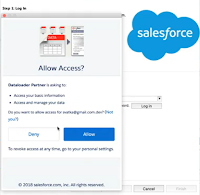
It allows a user to authenticate to a partner application using their Salesforce login credentials. Once logged, a user must approve that the partner application can access certain elements in Salesforce (you define those in your connected app).
This flow assumes by default that partner applications cannot be trusted, hence you should use this flow when your partner application cannot protect the client secret issued by Salesforce's connected app.
This, for example, is the case in mobile or desktop applications that you would like to connect to Salesforce where the source code of the application is accessible by the user and the client secret could be exposed easily. The benefit of this flow is that Salesforce issues a refresh token, meaning that even when your access token expires, you are able to obtain a new one by executing the refresh token flow. This will save the user from having to log in to Salesforce again.
Web Server Authentication Flow (Authorization code grant type)
This is used for Web App Integration. If you are integrating an external web service (the Customer Order Status website) with the Salesforce API, you can use Web Server authentication flow if:
For example, you’ve recently developed a website that allows secure access to customer order status. The order status data is securely stored in your Salesforce CRM platform. To authorize Help Desk users to view a customer’s order status, you develop an Order Status app and configure it as a connected app with the web server flow.
This flow still requires the user to actively log in to Salesforce and to approve access hence I would not use this flow when connecting API-only applications (such as an ESB or ETL tool that connects to Salesforce).
This flow also issues you refresh token and the user does not need to approve the access again.

JWT Bearer Token Flow (Server-to-Server Integration)
In some cases, you need to authorize servers without interactively logging in each time the servers need to exchange information.If you want to connect an API-only application that essentially does not provide a UI that would allow a user to approve the external application, it would be strongly recommended the OAuth 2.0 JWT Bearer Token Flow.
To provide authorization for server-to-server integration, you can use the OAuth 2.0 JSON Web Token (JWT) bearer flow. This flow requires prior approval of the client app.
The OAuth 2.0 JWT Bearer Token Flow requires you to upload a certificate to your connected app that will be used to validate the JWT token. As the name of the flow already states, you will need to create a JWT token. This is basically a JSON file consisting of a header and claims object, where the header contains the signature algorithm and the object of the claim contains specific information such as the username and consumer key. At a high level, you will then sign the JSON object with the private key of your certificate and send the JWT to Salesforce to obtain an access token. This flow does not issue a refresh token and the server must create a new JWT token once the access token expires.
SAML Bearer Assertion Flow
If your organization uses a central access control such as an active directory or LDAP store, it is likely that you would SSO to authenticate to your application. In this scenario, you may also want to use the SAML assertion from your SSO flow to obtain an access token to Salesforce.
This flow basically takes the SAML assertion (an XML token issued by your IdP) and applies a digital signature to it using a certificate. The connected app configuration in Salesforce is similar to the one done in the JWT Bearer Token Flow wherein a certificate is uploaded which is used to sign the SAML assertion.
Refresh Token Flow
As part of the web server and user-agent flows, a connected app can use a refresh token to request a new access token after the current access token expires. This flow is particularly helpful when you don’t want user intervention after an app is authorized.
Username-Password Flow-
IoT Integration (OAuth 2.0 Device Flow)
To integrate devices with limited input or display capabilities, such as Smart TVs, you can configure connected apps with the OAuth 2.0 device flow.
With the device flow, end users can authorize connected apps to access Salesforce data using a web-based browser.
For example, a customer uses your bluetooth device to control their house lights while they are away for the evening. You can create a connected app for the bluetooth device to enable this flow.

Reference
Web Server flow
Connected App