About Me

My photo
PLANO, Texas, United States

Wednesday, July 15, 2020

Communities User Licenses

A user license determines the baseline of features that the user can access. Every user must have exactly one user license. You can view the user licenses that your company has purchased to know what you have available to assign to your users.
There are three types of licenses in the community:
  1. Customer Community License
    • Customer Community Licenses get a basic feature.
    • If external users who need access to case objects or knowledge, you can use a customer community license.
    •  It includes High Volume Customer Portal, Service Cloud Portal, Authenticated Sites Portal.
    • Customer Community Licenses can’t have roles, hence they can’t take advantage of role-based sharing and the sharing set is used for them.
  2.  Customer Community Plus
    • If your community members need access to below, Then you probably need Customer Community Plus Licenses
      •  Reports and dashboards
      • Delegated admin
      • Content libraries
      • Records across accounts
    • Salesforce normal sharing rule works for Custom Community Plus.
  3.  Partner Community
    • If In addition to the above (Customer Community Plus), do your community members also need access to below object, Then you probably need Partner Community Licenses
      • Leads and opportunities
      • Campaigns
    • Salesforce normal sharing rule works for Custom Community Plus
In short, Customer Community Licenses get a basic pass, just like an economy ticket. Customer Community Plus Licenses get more access, like business travelers. Partner Community Licenses get way more access, pretty much like first-class travelers.


Monday, July 13, 2020

Explicit Vs Implicit Sharing

Explicit sharing means that the admin must be aware of the fact that objects share common data like sharing the record with different ways Sharing rule, Account team etc. Implicit sharing means that the sharing mechanism takes place behind the scenes and the admin does not need to worry about it.
There are some instances where a user can view a private record without being granted access to it. When you have access to a record, you automatically receive access to read its parent record (if you can see a contact, you can see its account). The same is true for seeing child records. This concept is called Implicit Sharing, and only ever provides read access (never write access).
Type of Sharing:
  1. Parent Implicit Sharing: Read-only access to the parent account for a user with access to a child record. Read-only access to the parent account for a user with access to a child record
  2. Child Implicit Sharing: This sharing provides access to child records if the user is the owner of the parent record. Child implicit sharing only applies to contact, opportunity, and case objects (children of the account)
  3. Portal Implicit Sharing: Access to portal account and all associated contacts for all portal users under that account
  4. High Volume Portal Implicit Sharing: In this Implicit sharing any record owned by high volume portal users will be shared with other high volume users who are part of the Sharing set.
  5. High Volume Parent Implicit Sharing: In this implicit sharing, read-only access will be given to parent account of records shared through a sharing set to other user members.


Best Practices for avoiding performance issue due to sharing rule

Every time you save a record, there are lots of actions being performed to determine who deserves access to it. Sharing rules, territory, and Apex code which takes time and resources. Also, when you make certain changes to a user, like changing their role, everything needs to be recalculated to see what the user does and does not have access to.
During this period, the record you are changing, as well as its parent and sibling records (records owned by the same parent) are locked. While records are locked, any other changes made to them are denied - resulting in an error. In a multi-user environment, this can quickly become a problem. Therefore, when defining a sharing model, the goal is to minimize the time it takes to calculate access. But how does one do that?
  1. Avoid Ownership Skew (Avoid assigning one user too much ownership) – Skew refers to when non-uniform distribution happens. Ownership skew occurred when one user owns lots and lots of records on the same object, like an integration user creating lots of records without assigning them to a new owner or a customer can assign all of his or her unassigned leads to a dummy user. The rule of thumb is not to go over 10,000 records per user. If you must have ownership skew, then at the very least that user should be at the ‘top’ of the role hierarchy, so sharing does not roll up to other users. If it is not possible to prevent Ownership Skew, Salesforce recommends the following options
    • Ensure that the user who owns a large number of records of the same object do not have a role, or the user is placed in a role without any hierarchy
    • If organization-wide sharing of an object and visibility needs to be granted to additional users, it is best to grant access at the profile level.
    • If profile level access is not possible to provide, then criteria-based sharing rule can be given to grant additional access in such cases.
  2. Avoid Data Skew - Data skew primarily refers to a non-uniform distribution in a dataset. When a single parent record has many child records, such as having a dummy account to hold all your contacts. The same recommendation of 10,000 records per parent applies.
  3. Whenever possible, use Public Read/Write org wide defaults. Sharing is essentially disabled for public objects - so the risk is entirely mitigated.
  4. When making large changes, such as a big data import, mass changes to record ownership, role hierarchy, or redefining sharing rules, temporarily defer (pause) sharing. Enable them afterwards to recalculate all the changes.

Sharing in Communities

Communities are designed for salesforce external users. Sharing is caring, however, way of sharing in community cloud has different challenges. 
Customer Community License has a much more limited level of access to the community’s objects compared to other community license holders and Salesforce internal org users. Because these license holders do not have roles within Salesforce, so they can’t take advantage of role-based sharing. 

By default, members with a Customer Community License can see only their own records, such as the cases they file with support. They can’t see anyone else’s cases in the community.

Customer Community User licenses utilize two entirely new mechanisms.
  1. Sharing Sets determine what records are shared with community users. A sharing set gives community users access to records that are associated with their accounts or contacts based on their user profile. Records can be exposed if they are related (directly or indirectly) to the user’s contact or account. For example, a user can see the cases that he or she raised because they are related to the same contact. The admin can set up only one sharing set per profile per object.
  2. Sharing Groups determine who can see records owned by community users (high-volume portal). A sharing group allows you to share records owned by Customer Community License holders with internal and external users in your community. For example, European users who raise cases could have those cases shared with EMEA support agents. Deactivating a share group removes all other users’ access to records owned by high-volume community or portal users.
Note- Sharing sets and groups are configured in Communities Settings, rather than the standard sharing configuration page.
What is a Partner super user?

You can grant super user access to the external users if he/she belongs to Partner Community or a Customer Community Plus license. Granting super user access to external users in your community lets them access more data and records, regardless of sharing rules and organization-wide defaults. Super users can access data owned by other partner users who have the same role or a role below them. Super user access applies to cases, leads, custom objects, and opportunities only.

Monday, May 2, 2016

Data Migration Consideration


While doing the Data Migration activities, the below points must be taken care of for a smooth migration:
  1. Decide the correct Mapping FileIn order to start any new migration from the legacy system to New Salesforce System, we must decide the mapping file correctly. 70% works done if we can finalize the mapping file correctly.
  2. Identify the ordering of insertion of objects: When inserting the records into the new system, it is extremely important to identify the ordering of insertion of objects into Salesforce. As a trivial example, you will need to insert all the accounts first, and then all the contacts so that relationships between contacts and accounts are set up properly.
  3. Enable "Create Audit Fields: Typically CreatedBy, CreatedDate, LastModifiedByID,  LastModifiedDate are read-only fields. However, during data migrations, it is generally desirable to insert records with legacy dates and ids to match the source system. In order to do this, we must have “Set Audit Fields” permission along with Modify All permission. Setup -> Customize -> User Interface -> Enable "Set Audit Fields upon Record Creation" and "Update Records with Inactive Owners" User Permissions
  4. Time Zone Setting: When inserting date fields, the Salesforce data loader uses the time zone of the user inserting records. The user id is used to insert records that should have “proper” time-zone settings.
  5. Publish Cut-over plan of Data Migration: It is important to plan out the data migration. The users should be informed well in advance about the cut-off date, and possible issues that may happen. Also, it is always a good idea to have a few pilot users available to test over the weekend in which a major data migration is planned.
  6. Sanity Check: It is also import to do sanity testing directly in Salesforce. Login as different types of users, and view a few records of different objects. Compare these same records manually with the original system. Although many tools are available, there is no replacement to manual verification when testing data migration.

Saturday, March 12, 2016

Schedule the APEX Data Loader

In order to execute the data loader activity on the particular time, First we have to create .bat file and then we have to schedule it. This article describes how to create the .bat file and how can we schedule it.
  • Create the .bat file
Once you setup all file (process-conf, sample.key) for the data loader CLI, we need to create the .bat file  so that we can schedule this file. 

Write the below script in notepad and save it as fileName.bat.

REN Call the Process from Below Command 
cd "C:\Program Files (x86)\salesforce.com\Data Loader\bin"
CALL process "C:\Users\user\Desktop\Data Loader CLI\samples\conf"  "csvTaskExtractProcess"
REN Rename the file name appending Date and time
for /F "tokens=2-4 delims=/ " %%i in ('date /t') do set yyyymmdd=%%k%%i%%j
echo Date: %yyyymmdd%
for /F "tokens=1-2 delims=: " %%l in ('time /t') do set hhmm=%%l%%m
echo Time: %hhmm%
echo %yyyymmdd%%hhmm%
rename "C:\Users\user\Desktop\Data Loader CLI\samples\data\Virtual_Engagement_Contact_Details _IB_.csv" "Virtual_Engagement_Contact_Details _IB_%yyyymmdd%%hhmm%.csv"

pause
  • Schedule a Batch File to run automatically
Step 1: Create a batch file you wish to run and place it under a folder where you have enough permissions. For example under C drive.

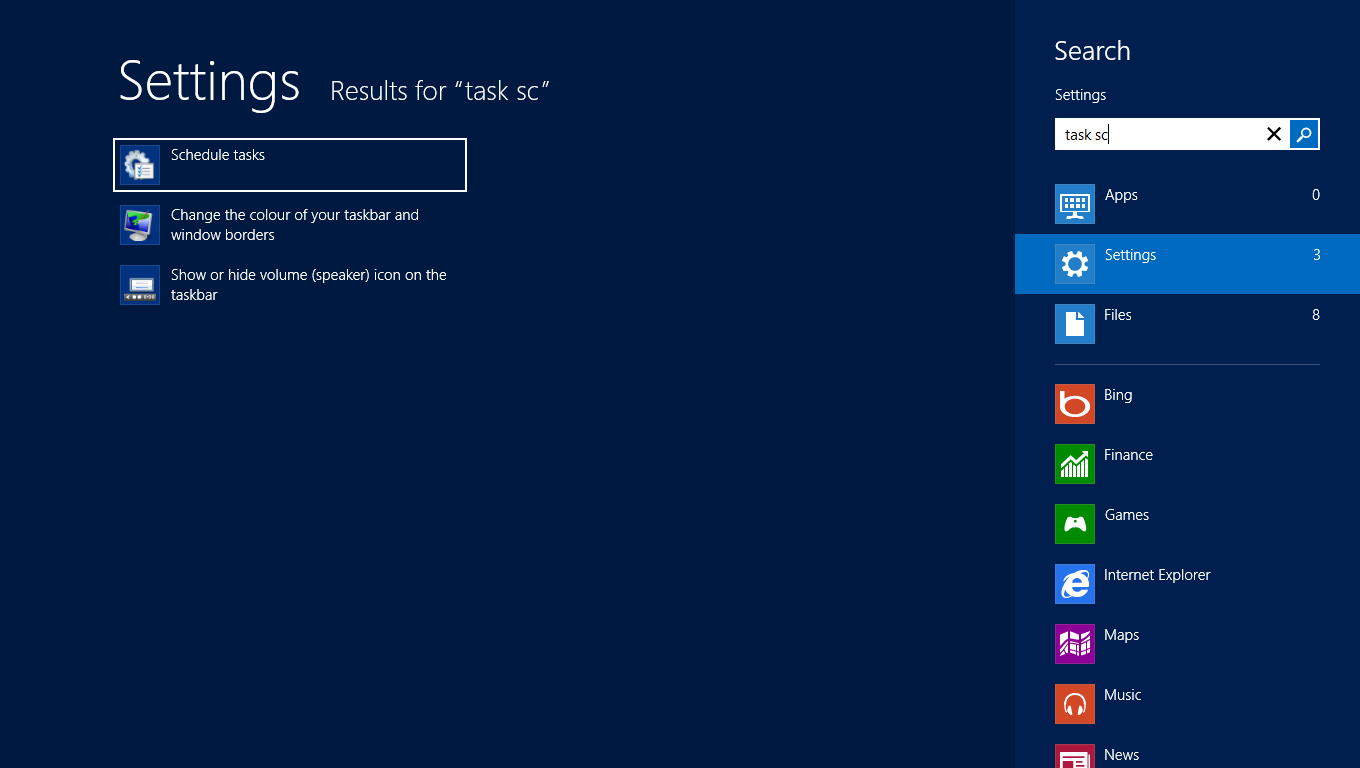
Step 2: Click on Start and under search(Setting), type in Task Scheduler.


Step3: Click on Create Task and fill the required details and schedule the bat file.

Tuesday, February 2, 2016

Territory Management

  • Territory management is an account-sharing system that grants access to accounts based on the characteristics of the accounts.
  •  Particularly if your organization has a private sharing model, you may need to grant users access to accounts based on criteria such as postal code, industry, revenue, or a custom field that is relevant to your business.
  • You may also need to generate forecasts for these diverse categories of accounts. Territory management solves these business needs and provides a powerful solution for structuring your users, accounts, and their associated contacts, opportunities, and cases.
  • It helps right sales rep is assigned to the right customers. 

Key Benefits:
  • To improve sales coverage and reduce overlap
  • To align sales teams with market potential
  • To scale operations as business grows
  • To analyze performance by territory 
  • To adapt to changes like mergers, product shifts or expansion

Note: Territory management only affects accounts and the standard objects that have a master-detail relationship to accounts. For example, opportunities are included in territory management but leads are not.

Territory
  • Collection of accounts and users where the users have at least read access to the accounts, regardless of who owns the account.
  • By configuring territory settings, users in a territory can be granted read, read/write, or owner-like access (that is, the ability to view, edit, transfer, and delete records) to the accounts in that territory. Both accounts and users can exist in multiple territories. You can manually add accounts to territories, or you can define account assignment rules that assign accounts to territories for you.

Territory Hierarchy
  • Territories exist in a hierarchy that you can set up with as many nested levels as you wish. For example, you could create a top-level territory named “Worldwide Sales” that has the child territories “North America,” “Europe/Middle East,” “Latin America,” “Africa,” and “Asia/Australia.” “North America” might have the child territories “Canada” and “United States.“ “United States” might have the child territories “Western,” “Central,” “Southern,” and “Eastern.” Finally, “Western” might have the child territories “California,” “Oregon,” “Washington,” “Nevada,” “Arizona,” and “Utah.”
  • Territory hierarchies do not have to be focused on geography; they can be defined however you like.

Territories' Effect on Forecasting:
  • When you enable territory management for your organization, the territory hierarchy also becomes the forecast hierarchy
  • Your forecast data is derived from the opportunities that are associated with the accounts in your territories. Users have a different forecast for each territory to which they are assigned. For example, if you are assigned to both “California” and “Arizona,” you have a separate forecast for the opportunities you have in each of these territories.